Programmable autonomous vehicles – Fundamentals, Part I
We are all more or less familiar with the term and use-value of programmable autonomous vehicles (mobile robots). This article explain basic concepts related to mobile robots, covers DC motors selection, H-Bridge explanation and basic interfacing between DC motor driver and microcontroller.
Programmable autonomous vehicle architecture
Programmable autonomous vehicle architecture
Figure 1. shows the block diagram of programmable autonomous vehicles (the mobile robot). The main component is a control unit which represents the "intelligence" of the mobile robot. Regarding mobile robot two additional components are required: sensors and interrupt unit. Sensors are mandatory part in order to gather information from a space in which the mobile robot is currently located. The collected signals are forwarded to the interrupt unit which states the control unit by a certain algorithm (priorities).The decision depends on the current state and type of the sensor signal. These components (control unit and sensors) makes mobile robot programmable and autonomous at the same time. Microcontrollers are the most common control unit devices. Alongside the CPU (central processing unit) and memory (RAM/ROM), microcontroller integrates interrupt controller that makes them suitable choice. For this project MikroElektronika Easy 8051 v6 Development System board with Atmel AT89S8253 (Intel 8051 based central processor unit) microcontroller device were used.
 |
| Figure 1. Programmable autonomous vehicle architecture |
Actuators are mechanical energy generators. These devices are designed to convert one form of input energy into an output mechanical energy in order to provide object movement (translation/rotation). Each actuator has: type of input energy (fluid, or electric), the field of usage and control method. DC motors are actuators commonly used by mobile robots and belongs to the class of electric actuators. DC motor transform input electrical energy into mechanical output energy. As it is presented in this article, torque (Newton meter) is one of the most important parameter regarding DC motor selection and depends on several different parameters like: mobile robot weight, frictional force, mobile robot acceleration etc.
Regarding small output current provided by control unit, DC motors are not directly driven by microcontroller devices. Instead, to amplify current source, DC motors are driven by device drivers or DC motor drivers. There are different types and solutions related to DC motor device drivers based on powerful transistors and integrated circuits which will be discussed in this article.
DC Motor selection
Before we start designing hardware, it is necessary to define mobile robot actions/tasks in order to choose right DC motor. By rule, this is the first step before the selection of the DC motor. The selection of DC motor is not an easy task and involves calculations depending on several different variables: the number of wheels (diameter), speed, acceleration, inclination which the vehicle needs to overcome, terrain, frictional force, the weight that the vehicle must take, the mobile robot total weight and so on. The result is a required torque (Newton - meter) which is the basis for DC motor selection. If you want to invest, you have a wide selection of online stores that offer free tutorials / calculators including all necessary details (DC Motor Selection).
 |
| Driving DC motor (left and middle picture) and unipolar stepper motor (right picture) |
Another option is to use DC motors that you already have available and then to do reverse calculations to determine limits of the vehicles. For this project two DC motors were used: a standard DC motor (Mabuchi 12V, two wires) and unipolar stepper motor (Mitsumi M35SP-7, 5 wires), to drive and control mobile robot front wheels, respectively.
Unipolar stepper motor
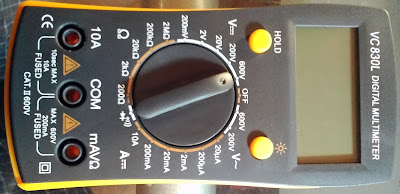
Stepper motors are electrical actuators, DC motors, designed to control rotational movement by positioning the motor shaft to the desired number of degrees in one of two possible directions. The degree of rotation depends on the structure / number of poles and it is defined under specification (Mitsumi M35SP-7, step angle is 7.5 °). M35SP-7 has a five wires of which one is common. Other wires are used for controlled rotation. Some manufacturers encode wires with color which simplifies work. Let's say: red wire is the common wire and therefore we know that it is tied to the power supply (+12V for example). Based on the color of other wires, we know control signal sequence used to rotate the motor shaft to the desired number of degrees in the desired direction. Monochrome wires are the problem (all wires encoded with the same color). In such a case, ohm meter is required measurement device in order to determine common wire and control signal wires (Figure #2).
Unipolar stepper motor
Stepper motors are electrical actuators, DC motors, designed to control rotational movement by positioning the motor shaft to the desired number of degrees in one of two possible directions. The degree of rotation depends on the structure / number of poles and it is defined under specification (Mitsumi M35SP-7, step angle is 7.5 °). M35SP-7 has a five wires of which one is common. Other wires are used for controlled rotation. Some manufacturers encode wires with color which simplifies work. Let's say: red wire is the common wire and therefore we know that it is tied to the power supply (+12V for example). Based on the color of other wires, we know control signal sequence used to rotate the motor shaft to the desired number of degrees in the desired direction. Monochrome wires are the problem (all wires encoded with the same color). In such a case, ohm meter is required measurement device in order to determine common wire and control signal wires (Figure #2).
 |
| Figure 2.Resistance between coils |
The winding resistance between the common wire and control wires is twice smaller in comparison to the resistance between the windings of any other of the control wires. Determination of the control signal sequence comes down to guessing where the rule is simple, the motor shaft must rotate in the same direction (you decide about the direction). Thereby, the common wire is connected to the positive pole of the battery (power supply) while the control wires are alternately bind to the negative pole, one by one until continuous rotation in chosen direction is achieved. Experiment includes all control wires. As they are all one-colored (monochrome), you can encode them in any way. The control signal sequence write down on the paper, because it is used for the control software.
 |
| Stepper motor controller - software implementation |
H-Bridge
H-Bridge is the power amplification circuit, device driver or DC motor driver. It is designed to control bidirectional DC motor rotation (forward / backward) with the possibility of braking. The letter H in its name comes from the conceptual circuit configuration consisting of four switches and DC motor (Figure #3.a). If the switches P1 and P4 are active, motor rotates in one direction (Figure 3.b). If the switches P2 and P3 are active motor rotates in the direction 2 (Figure 3.c). As the switches P3 and P4 are related to mass, motor brakes when they are active.
 |
| Figure 3. H-Bridge concept |
Figure 4. shows the implementation with a powerful transistors. The circuit is compatible with TTL voltage standard which makes it easy to interface with microcontroller. R1 to R4 are current limiting resistors providing a potential difference between the base and emitter to set transistor working point in one of two areas: saturation or cut-off. If a logical one value is set on the output pin of the microcontroller (~ + 5V), the working point of the transistor is located in the area of saturation, inversely in the cut-off area. By changing the direction of rotation, the back electromotive force (EMF) of DC motor can be devastating for transistors. Diodes in circuit are protects transistors so that peaks of back electromotive force are directed to the power supply - fly back diodes, protection diodes. If you decide for realization of the circuit from Figure 4, a good solution is not to directly solder the components on the PCB. Instead, use a pin-head connectors (or some other connector – depends on current intensity) that enable easy installation / replacement. The reason is that by a rule the selection of transistors is performed after the selection of the DC motor, whereby it should fulfill the condition that the collector declared maximum current is bigger or equal to the declared maximum current of selected DC motor. As this is about powerful transistors, leave enough space on the PCB to install passive cooling systems (heatsink). Anyway, the circuit from Figure 4. with TIP41A transistor (TO-220, Icmax = 6A) is proper solution for the most standard DC motors related to mobile robots. Next thing on which we need to pay attention is coupling a device driver (DC motor driver) with MCU according to a number of required pins. Optimization of the number of pins is important from several reasons: coupling (interfacing) the MCU and the device driver is simpler and thus is a control software, the selection of MCU by the number of ports becomes wider. For example, if a complete solution requires one port, MCU AT89S8253 can be replaced with smaller AT89LP213 / 214 (requires less area on the PCB). Grouping pins of circuit of Figure 4. by a rule: 2 and 3 are short-circuited, 1 and 4 are short-circuited, reduces for half less the number of required pins. The DC motor brakes when the same logical levels are set on both pins. Using device driver such as ULN 2803, H-Bridge is further optimized by the number of used transistors. In some cases, in order to secure microcontroller device (control logic), interfacing between microcontroller and device driver is done by using opto-couplers like 4N25. The same configuration shown on Figure 4. could be implemented with MOSFET power transistors.
 |
| Figure 4. H-Bridge implementation with TO-220 TIP41 |
 |
| TIP41A Power transistor (left) TO-220 Heatsink (right) |
SERPENT I
SERPENT I (also known as: snake) is heavy weight H-Bridge DC motor controller, designed and assembled by zilsel-invent. PCB is manufactured in Serbia by PCB manufacturing service Ei PCB Factory Niš. The H-Bridge is based on 4x power MOSFET IRF3710 transistors declared on 57A continuous current, providing PWM (pulse width modulation) bidirectional speed control including enable/disable signals. SERPENT I is applicable for: inverter circuit (DC/AC) controllers, DC motor applications including Internet of Things and Embedded Robotics. For more details about SERPENT I please look @ the following url: http://www.zilsel-invent.com/serpent1/serpent1-assembled.xhtml.
SERPENT I (also known as: snake) is heavy weight H-Bridge DC motor controller, designed and assembled by zilsel-invent. PCB is manufactured in Serbia by PCB manufacturing service Ei PCB Factory Niš. The H-Bridge is based on 4x power MOSFET IRF3710 transistors declared on 57A continuous current, providing PWM (pulse width modulation) bidirectional speed control including enable/disable signals. SERPENT I is applicable for: inverter circuit (DC/AC) controllers, DC motor applications including Internet of Things and Embedded Robotics. For more details about SERPENT I please look @ the following url: http://www.zilsel-invent.com/serpent1/serpent1-assembled.xhtml.
VIDEO: SERPENT I White-Black assembled edition, video, Arduino UNO, Motor Speed controller with bidirectional control and enable signal.
Posted by Zilsel Invent on Saturday, November 28, 2015
New video...
Posted by Vladimir Savić on Saturday, October 31, 2015
L293D IC
L293D is a circuit that belongs to the category of device driver. It is intended for inductive consumers up to 600mA in the range of 4.5 to 36V. The inputs of L293D are compatible with TTL voltage standard. It features a protective diodes against back electromotive force. The outputs are totem-pole circuit with Darlington Sink & Source transistors. If you decide to use L293D circuit, take care of two things: the number of pins required to interface L293D with the microcontroller and a number of required DC motors. In addition to the control signals required for DC motors, the circuit has enable driver signals (EN). If EN signal is connect to + Vcc (all drivers are active), the maximum number of pins for connection with MCU is four. As with the circuit of Figure 4. this circuit cannot control standard and unipolar stepper motor at the same time. On the other side with ULN 2803 IC design is simpler with possibility to control both DC motors with single IC. Anyway, the L293D IC requires a passive cooling system. As the dissipated heat is controlled by directing heat to the GND pins, copper surfaces on the PCB should be as large as possible.
ULN 2803 IC
ULN 2803 is a circuit that makes 8-channel series of Darlington transistors with open collector (Icmax = 500mA). The inputs are compatible with TTL voltage standard. It features protective diodes against back electromotive force (COM pin). With circuit we can control: 4 x H-Bridges or 2 x unipolar stepper motors or a seven-segment display with decimal point, or combine them. For the purposes of the project following components were used: standard DC motor (H-Bridge, 2 x transistor), a unipolar stepper motor (4 x transistors) and for diagnostic / indications (LE diodes, 2 x transistors). As for the LE diodes and indications, in this case, these components does not requires driver, you can couple them directly to a microcontroller device. Scheme of coupling with a MCU is shown in Figure 5.
 |
| Figure 5. Electrical schematic: interfacing micro controller and device driver |
Presented configuration requires an appropriate arrangement of the control signals in time. In the specification for ULN 2803 circuit, you can find diagrams related to maximum collector current, depending on the number of active transistors per time unit. If all 8 channels are active, the collector current must be limited to the values declared by the diagram (~ 180mA). Otherwise, high dissipation of heat can permanently destroy the integrated circuit. Reducing the number of active transistors per unit of time increases maximum allowed intensity of collector current (for 4x active channels ~ 300mA, one active channel 500mA). Therefore, the control signals are organized in fashion that one transistor could be active 1/8 (duty cycle) units of time, while the remaining 7/8 (cooling time) is waiting for a new signal.
Device driver is implemented on a separate PCB in order to be reused for other projects purposes (Figure 6). For instance, if you decide to implement other types of robots (www.cornerstonerobotics.org/_images/insectronics.jpg), device driver will certainly be needed. For this project, PCB with the finished strip copper pipes and drilled holes were used. ULN 2803 is not directly soldered to the board, instead DIP-18 socket were used. By doing so, you are able to use other ULN 28xx IC circuits compatible by pins organization with ULN 2803 IC. Each channel provides set of the pin-head (female) connectors / terminals, thus providing a universal solution for mounting other electronic components and interface with other devices. At the upper side of the ULN2xxx, board there is a placeholder intended for passive heatsink installation. ULN2xxx board is equipped with 2xLE diodes for channel diagnostic and indication.
 |
| ULN2xxx Device Driver - DC motor driver |
Device driver (ULN2xxx) is vertically installed on the mobile robot and coupled with a microcontroller (with development board) with conductors up to 1 meter, which gives enough space for testing. Regarding the mobile robot construction and weight, it is better to use light materials, otherwise you will have problem with frictional force and your mobile robot will stand in place.

Related projects:
Related articles:
Feel the force around you – Normal forceNormal force - Real catalog examples and calculations
Feel the force around you – Frictional force Part I
Feel the force around you – Frictional force Part II
Feel the force around you – Frictional force Part III
Feel the force around you – Frictional force Part IV
Feel the force around you – Frictional force Part V
Power switch as current amplifier
SERPENT I - DC motor controller/driver
SERPENT I - PCB DIY (do it yourself) assembling - video clips examples
SERPENT II - Pit VIPER Rattle - DC motor controller/driver
How to build do it yourself printed circuit board (DIY PCB) by using thermal transfer method
DC motor torque vs DC motor speed
How to design voltage reference by limiting current consumption
Fake VC830L digital multimeter
zilsel-invent assumes no responsibility or liability for any errors or inaccuracies that may appear in the present document. Specification and information contained in the present schematics are subject to change at any time without notice.
Related videos:
Umberto Cilia (Sicilia - Italy): Arduino UNO based mobile robot
Modifiche al Robottino Gino, diametro base dimezzato, codice snellito, baricentro spostato in avanti ed lcd più intuitivo
Posted by Designleaves Graphic on Sunday, March 20, 2016


Thanks for comment
ReplyDeleteThanks for sharing nice blog about Robots and device solutions.
ReplyDeleteThank you for the comment!
DeleteThanks for sharing nice blog about Robots and device solutions.
ReplyDeleteThank you for the comment!
DeleteCrafsol Technology is the worlds largest provider of Robots and Device Solutions that interconnect robots revolutionary in accelerating systems, low cost and high efficiency program to connect Robots and Device solutions.
ReplyDeleteRobots and Device Solutions